Pod Installation
Set up your Midco Wi-Fi on your own! It’s easier than you may think, but we’re here if you need us.
Order Your Pod(s)
If you’re a new customer or someone adding pods to a current service, you can order a mailed, self-install kit by contacting us.
If you’re a customer moving services to a new address, just bring all current Midco equipment (including cords) to your new location.
Note: If you have old Midco equipment on your account, it will remain active for 14 days. If you leased it from us, please return it to us.
Curious about pro installation? We have technicians available to install Midco Wi-Fi, too. Or, if you’re new to Midco, you may need us anyway. Contact us to learn more.
Install Your Pods
Pod self-installation varies based on service and equipment type, as well as some in-home factors.
We have guided installation (ideal for mobile devices). Or, choose your internet delivery device type below and follow the instructions provided from there.
Log in and prep your equipment.
When signing up for Midco, a My Account was created for you. If you’re new to Midco or have never signed in before, go to Midco.com/MyAccount to set up your account.
- Log in to your Midco My Account to let us know you’re installing new equipment.
- Follow the activation instructions on screen.
- Unplug and disconnect your old modem, Wi-Fi extender(s) and/or router(s) to make room for your new equipment and prevent Wi-Fi performance issues. This will take your Wi-Fi-powered devices offline.
- This may take your Wi-Fi-powered devices offline.
Install your modem.
- Find a central spot in your home, off the floor, near a power outlet and a coax cable outlet for your modem. Some coax cable outlets may not be active, so you may need to try more than one.
- Use the coax cable to connect your modem to a coax cable outlet.
- Are you connecting more than one coax-based service today? Use the splitter setup instructions if you need them.
- Use the power cord to plug your modem into a power outlet.
Wait up to 15 minutes for the online, upstream, downstream and power lights to stop flashing and remain solid.
![]()
Note: Your lights may blink from time to time – that's OK. The color of lights on your modem may vary depending on your model.
Before you continue:
- Make sure you’re using the coax cable we provided.
- Double check that your connections are finger tight.
- If the Power light is not on, try a different power outlet.
- If the Online light is off, or if the light is solid but your upstream/downstream (US/DS) lights are not – reboot the modem by unplugging it from power. Wait 30 seconds and plug it back in.
Install your Pod(s).
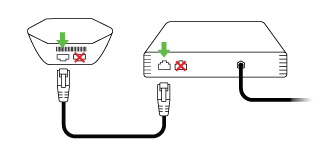
- Using your Ethernet cable, connect your pod and modem.
- Depending on your modem, you may have one or two Ethernet ports. If one has a globe icon next to it, use that. If not, use the first one.
- When connecting to your modem, be sure to plug it into the first Ethernet port. The second port is inactive.
- If you received the optional network switch to connect more devices directly to Ethernet, connect it to the pod using the manufacturer instructions.
- Grab your smartphone. Go to settings and ensure your Bluetooth is turned on.
- Go to the App Store or Google Play to download the Midco Wi-Fi app. Open the app.
- Tap Sign in, and log in using your Midco My Account credentials. Follow the app instructions to place and set up equipment.
- Keep your smartphone close to the pod, so the app can find it via Bluetooth.
- Tapping the info icon next to each step provides detailed instructions.
- Advanced setup is also available here, but not necessary for most users.
- It’s possible your pod will need to update before it connects. (This can take up to 10 minutes.)
- Your pods use lights to communicate. See our pod light guide for more information.
- Once prompted on-screen, enter your Wi-Fi network name and password.
- Recommended: It’s best to use your pre-existing Wi-Fi network name and password, so all devices will easily switch to the new Wi-Fi network.
- Alternatively, you can set up a completely new Wi-Fi network name and/or password – just know you’ll need to update those devices’ Wi-Fi network credentials after install.
- If applicable, set up remaining pod(s) in other rooms/floors at least 15-20 feet from the first pod.
- Use the placement tips in the app or learn more.
- Once all pods are connected, tap Done adding Pods. Follow the prompts to select your app notification settings.
- The app will prompt you to join the new Wi-Fi network. Tap Join to go to your settings to complete the Wi-Fi connection.
- Continue through the remaining app setup, including naming pods for easier identification.
Almost there!
If you changed your Wi-Fi network name and password, manually connect additional devices to your new in-home Wi-Fi (including MidcoTV®, if applicable).
- If you had MidcoTV hardwired to your modem or router via an Ethernet cable, it now needs to connect to either a pod, an Ethernet wall outlet or an Ethernet network switch.
Start enjoying Midco Wi-Fi!
Over the next 24 hours, the network will learn and self-optimize – custom to your home.
Log in and prep your equipment.
When signing up for Midco, a My Account was created for you. If you’re new to Midco or have never signed in before, go to Midco.com/MyAccount to set up your account.
- Log in to your Midco My Account to let us know you’re installing new equipment.
- Follow the activation instructions on screen.
- Why do you need to do this? This will reconfigure your existing modem to support and connect your new Midco Wi-Fi.
- Leave your current modem plugged in to your power and coax cable outlets as is, but you can unplug it from other equipment.
- To prevent performance issues, disconnect any non-modem Wi-Fi equipment such as Wi-Fi extenders or routers.
- This may take your Wi-Fi-powered devices offline.
Install your pod(s).
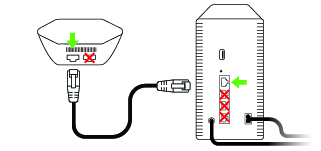
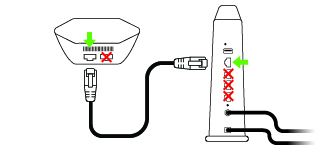
- Using your Ethernet cable, connect your pod and modem.
- Depending on your modem, you may have one or two Ethernet ports. If one has a globe icon next to it, use that. If not, use the first one.
- When connecting to your modem, be sure to plug it into the first (top) Ethernet port on the back of your modem. The other ports are inactive.
- If you received the optional network switch to connect more devices directly to Ethernet, connect it to the pod using the enclosed manufacturer instructions.
- Grab your smartphone. Go to settings and ensure your Bluetooth is turned on.
- Go to the App Store or Google Play to download the Midco Wi-Fi app. Open the app.
- Tap Sign in, and log in using your Midco My Account credentials. Follow the app instructions to place and set up equipment.
- Keep your smartphone close to the pod, so the app can find it via Bluetooth.
- Tapping the info icon next to each step provides detailed instructions.
- Advanced setup is also available here, but not necessary for most users.
- It’s possible your pod will need to update before it connects. (This can take up to 10 minutes.)
- Your pods use lights to communicate. See our pod light guide for more information.
- Once prompted on-screen, enter your Wi-Fi network name and password.
- Recommended: It’s best to use your pre-existing Wi-Fi network name and password, so all devices will easily switch to the new Wi-Fi network.
- Alternatively, you can set up a completely new Wi-Fi network name and/or password – just know you’ll need to update those devices’ Wi-Fi network credentials after install.
- If applicable, set up remaining pod(s) in other rooms/floors at least 15-20 feet from the first pod.
- Use the placement tips in the app.
- Once all pods are connected, tap Done adding Pods. Follow the prompts to select your app notification settings.
- The app will prompt you to join the new Wi-Fi network. Tap Join to go to your settings to complete the Wi-Fi connection.
- Continue through the remaining app setup, including naming pods for easier identification.
Almost there!
If you changed your Wi-Fi network name and password, manually connect additional devices to your new in-home Wi-Fi (including MidcoTV®, if applicable).
- If you had MidcoTV hardwired to your modem or router via an Ethernet cable, it now needs to connect to either a pod, an Ethernet wall outlet or an Ethernet network switch.
Start enjoying Midco Wi-Fi!
Over the next 24 hours, the network will learn and self-optimize – custom to your home.
Log in and prep your equipment.
When signing up for Midco, a My Account was created for you. If you’re new to Midco or have never signed in before, go to Midco.com/MyAccount to set up your account.
- Log in to your Midco My Account to let us know you’re installing new equipment.
- Follow the activation instructions on screen.
- Leave your current fiber ONU plugged into your power outlet as is, but you can unplug it from other equipment.
- To prevent performance issues, disconnect any non-ONU Wi-Fi equipment such as Wi-Fi extenders or routers.
- This may take your Wi-Fi-powered devices offline.
Install your pod(s).
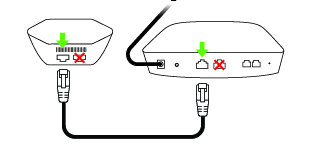
- Using your Ethernet cable, connect your pod and ONU.
- If your ONU has a globe icon next to one of your Ethernet ports, use that to connect. If not, use the 10G port.
- When connecting to your ONU, be sure to plug it into the 10GigE port on the back.
- If you received the optional network switch to connect more devices directly to Ethernet, connect it to the pod using the enclosed manufacturer instructions.
- Grab your smartphone. Go to settings and ensure your Bluetooth is turned on.
- Go to the App Store or Google Play to download the Midco Wi-Fi app. Open the app.
- Tap Sign in, and log in using your Midco My Account credentials. Follow the app instructions to place and set up equipment.
- The Midco Wi-Fi app refers to your ONU as a modem.
- Keep your smartphone close to the pod, so the app can find it via Bluetooth.
- Tapping the info icon next to each step provides detailed instructions.
- Advanced setup is also available here, but not necessary for most users.
- It’s possible your pod will need to update before it connects. (This can take up to 10 minutes.)
- Your pods use lights to communicate. See our pod light guide for more information.
- Once prompted on-screen, enter your Wi-Fi network name and password.
- Recommended: It’s best to use your pre-existing Wi-Fi network name and password, so all devices will easily switch to the new Wi-Fi network.
- Alternatively, you can set up a completely new Wi-Fi network name and/or password – just know you’ll need to update those devices’ Wi-Fi network credentials after install.
- If applicable, set up remaining pod(s) in other rooms/floors at least 15-20 feet from the first pod.
- Use the placement tips in the app or learn more.
- Once all pods are connected, tap Done adding Pods. Follow the prompts to select your app notification settings.
- The app will prompt you to join the new Wi-Fi network. Tap Join to go to your settings to complete the Wi-Fi connection.
- Continue through the remaining app setup, including naming pods for easier identification.
Almost there!
If you changed your Wi-Fi network name and password, manually connect additional devices to your new in-home Wi-Fi (including MidcoTV®, if applicable).
- If you had MidcoTV hardwired to your modem or router via an Ethernet cable, it now needs to connect to either a pod, an Ethernet wall outlet or an Ethernet network switch.
Start enjoying Midco Wi-Fi!
Over the next 24 hours, the network will learn and self-optimize – custom to your home.
Log in and prep your equipment.
When signing up for Midco, a My Account was created for you. If you’re new to Midco or have never signed in before, go to Midco.com/MyAccount to set up your account.
- Log in to your Midco My Account to let us know you’re installing new equipment.
- Follow the activation instructions on screen.
- Leave your current PoE adapter plugged into your power outlet as is, but you can unplug it from other equipment.
- To prevent performance issues, disconnect all other Wi-Fi equipment such as Wi-Fi extenders or routers.
- This may take your Wi-Fi-powered devices offline.
Install your pod(s).
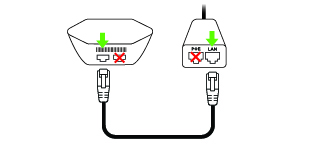
- Using your Ethernet cable, connect your pod and PoE adapter.
- Your PoE adapter may have one or two Ethernet ports. If one has a globe icon next to it, use that to connect. If not, use the first one (LAN Ethernet port).
- When connecting to your PoE adapter, be sure to plug it into the LAN Ethernet port.
- If you received the optional network switch to connect more devices directly to Ethernet, connect it to the pod using the enclosed manufacturer instructions.
- Grab your smartphone. Go to settings and ensure your Bluetooth is turned on.
- Go to the App Store or Google Play to download the Midco Wi-Fi app. Open the app.
- Tap Sign in, and log in using your Midco My Account credentials. Follow the app instructions to place and set up equipment.
- The Midco Wi-Fi app refers to your PoE adapter as a modem.
- Keep your smartphone close to the pod, so the app can find it via Bluetooth.
- Tapping the info icon next to each step provides detailed instructions.
- Advanced setup is also available here, but not necessary for most users.
- It’s possible your pod will need to update before it connects. (This can take up to 10 minutes.)
- Your pods use lights to communicate. See our pod light guide for more information.
- Once prompted on-screen, enter your Wi-Fi network name and password.
- Recommended: It’s best to use your pre-existing Wi-Fi network name and password, so all devices will easily switch to the new Wi-Fi network.
- Alternatively, you can set up a completely new Wi-Fi network name and/or password – just know you’ll need to update those devices’ Wi-Fi network credentials after install.
- If applicable, set up remaining pod(s) in other rooms/floors at least 15-20 feet from the first pod.
- Use the placement tips in the app or learn more.
- Once all pods are connected, tap Done adding Pods. Follow the prompts to select your app notification settings.
- The app will prompt you to join the new Wi-Fi network. Tap Join to go to your settings to complete the Wi-Fi connection.
- Continue through the remaining app setup, including naming pods for easier identification.
Almost there!
If you changed your Wi-Fi network name and password, manually connect additional devices to your new in-home Wi-Fi (including MidcoTV®, if applicable).
If you had MidcoTV hardwired to your modem or router via an Ethernet cable, it now needs to connect to either a pod, an Ethernet wall outlet or an Ethernet network switch.
Start enjoying Midco Wi-Fi!
Over the next 24 hours, the network will learn and self-optimize – custom to your home.
Installation Troubleshooting
If you are self-installing your equipment and are having trouble:
- Check if the power outlet is controlled by a light switch.
- Try different power or cable outlets to see if the one(s) you're using is inactive. If you find the modem works when connected to a different outlet, you can activate the outlet you want to use.
If the “Still looking for internet connection to Midco pod...” screen pops up, it means that the Midco Wi-Fi app is not detecting an internet signal. Here are useful tips to try:
- Double check your modem’s connection and reboot your modem – or use the modem troubleshooting tips to re-establish a connection.
- Try to plug the pod into another outlet. The LED should turn on when plugging it in.
- Be sure to turn on your device’s Bluetooth in your device settings.
The notification will automatically disappear once there’s a signal, and you can continue with your setup.


